By Jenny Hart
Even the most beautifully knitted garment can be ruined by poor finishing. Look closely at your work and check that everything looks alright. Check the obvious – that the neck will go over your head, that the sleeves are the desired length, the armholes are deep enough to be comfortable and, if all is well, finish the garment with a professional touch.
Correct Uneven Stitches
Before you sew in ends or block your garment, check over the fabric for any uneven stitches. Washing the garment will help to even out some of these wayward stitches but not all of them. Interruptions, tight yarn supply, distractions, and just your mood on the day can alter the tension. Use a cable needle to ease any stitches that look too loose or too tight. Spreading the tension over a number of stitches will be less noticeable. You may notice the occasional row that slants slightly. This is most noticeable in stocking stitch. It happens when the knitting has been left on the needles for a long time. There’s not much you can do about it at this stage. In future, consider unknitting a row before you begin again.
Weaving in Yarn Ends
I don’t think it’s a crime if there is an end that has missed being sewn in but it’s an easy task to turn a garment inside out to check. Part of the integrity of the fabric is that all ends are secure. If possible weave in ends along the selvedge. Otherwise follow the stitches (up, along, down, along) on the wrong side of the fabric. Running a thread directly along a straight line of stitches will show because it alters the tension but by imitating the stitch exactly it will be invisible.
Blocking or Washing
It is personal preference whether you block or wash individual pieces of a garment or wait until it is all joined together. Both these processes are a means of bonding stitches together. Natural fibres require less wetting than man made ones.
To block garment pieces, spread on an old towel and pat into shape. Spray to dampen with clean cold water. Leave to dry naturally. Pinning shouldn’t be necessary for most knitted fabric.
A lacy shawl with Vandyke edges will need to be pinned to show the pattern to best effect. Old towels on carpet works well.
If you choose to wash the garment pieces, use warm water and a detergent approved for hand knits. Lower the pieces into the water, give a few gentle squeezes to push the soapy water through the fabric. Support the fabric when you lift it out of the water to avoid any stretching. Squeeze out surplus water. Rinse, squeeze, spread out flat, pat into shape to dry.
Seams
There are so many choices: flat seam, invisible seam, edge to edge seam, backstitch seam, mattress stitch, lifted ladder seam and dare I say it – machine sewn seams. Unless the seam is to be a feature I like it to be invisible.
Use this invisible seam for stocking stitch:
- It can be started from either end and is worked from the right side.
- Pick up the strand of thread between the selvedge and the first stitch.
- Pick up alternating from side to side.
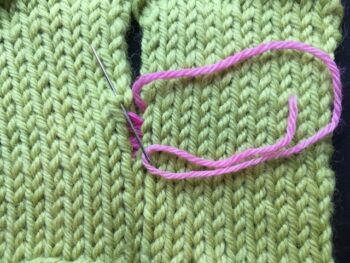
This edge to edge seam is almost invisible, neat, reversible and suitable for fine baby and lace work.
- Butt the two edges together and pin together with safety pins or T pins. Look for these T shaped pins at Patchwork outlets. They don’t get lost in the knitted fabric the way a normal pin does.
- With right side facing, identify the pips and the loops along the edge.
- Zig zag the needle from side to side coming up through the pips.
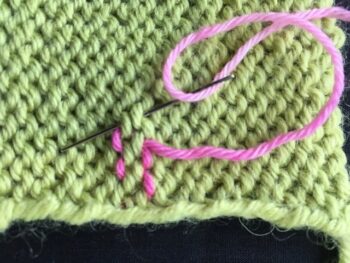
Mattress stitch gives an invisible seam on the outside but a ridge on the inside.
Always knit the first and last stitches in the knit row, and purl the first and last stitches in a purl row:
- Plan for a half or whole stitch seam allowance and a plain edge (it is difficult to do neatly with a slipped edge).
- Butt the two edges together.
- Bring the sewing needle up through the fabric one stitch in from the edge, go across and down into the fabric on the other edge, one stitch in.
- Across to side one, down into the first exit hole, under two bars, then up.
- Across to side two, down into the last exit hole, under two bars, then up.
- Do this really loosely for about 8 stitches before you draw up the yarn to the correct tension.
- For sewing the sleeves to the body, do your increases/decreases on the sleeve two stitches in from the edge. Allow seven rows of the body for five stitches from the sleeve.